Mastering WFS Transactions in GeoServer
GeoSpatial Techno is a startup focused on geospatial information that is providing e-learning courses to enhance the knowledge of geospatial information users, students, and other startups. The main approach of this startup is providing quality, valid specialized training in the field of geospatial information.
( YouTube | LinkedIn | Facebook | X )
Mastering WFS Transactions in GeoServer: A Comprehensive Guide
In this session, we’ll explore WFS transactions available in GeoServer. If you want to access the complete tutorial, click on the link.
Introduction
The Web Feature Service (WFS) transactions in GeoServer, enable users the ability to manipulate geographic data for serving and editing geospatial information over the web. This feature allows for direct editing of spatial features within a dataset through a web browser or application, without needing to download and edit the data locally.
WFS transactions in GeoServer allow users to dynamically edit spatial data by sending XML requests to insert, update, or delete features. This real-time editing is crucial for applications like online maps and collaborative planning systems. It improves efficiency, data accuracy, and supports real-time collaboration.
Note. This video was recorded on GeoServer 2.22.4, which is not the most up-to-date version. We encourage all users to use the stable series, currently 3.0.x. To ensure you have the latest release, please visit this link and avoid using older versions of GeoServer.
Note. In all examples in this blog post, we utilize the topp:tasmania_roads layer.
WFS Insert Feature
The Insert Feature operation, when used with GeoServer’s WFS transaction feature, allows users to append new features to an existing dataset. This ensures the new feature is securely added to the layer, preventing data duplication and errors.
Note. Backup your data and configuration before making any changes to avoid potential data loss or unexpected behavior.
Here is an example of how to use the WFS insert feature in GeoServer:
- Navigate to the Demos page, then click on the Demo requests link.
- From the Request drop-down list, select WFS_transactionInsert.xml.
-
Enter the new coordinates and road’s type as follows:
<wfs:Insert> <topp:tasmania_roads> <topp:the_geom> <gml:MultiLineString srsName="http://www.opengis.net/gml/srs/epsg.xml#4326"> <gml:lineStringMember> <gml:LineString> <gml:coordinates decimal="." cs="," ts=" "> 145.2,-42.5 145.2,-43.3 145.8,-43.3 </gml:coordinates> </gml:LineString> </gml:lineStringMember> </gml:MultiLineString> </topp:the_geom> <topp:TYPE>street</topp:TYPE> </topp:tasmania_roads> </wfs:Insert> - Remember that using the WFS transaction in GeoServer requires appropriate permissions and access rights to ensure that only authorized users can modify the data. Enter the username and password to be authorized, and then press the Submit button.
- GeoServer processes the transaction request. If successful, it adds the new feature to the road layer; if unsuccessful, a relevant error information is displayed and no changes are made to the data.
- Navigate to the Layer Preview section and open up the OpenLayers preview for the
tasmania_roadslayer. Your map should now look like this:
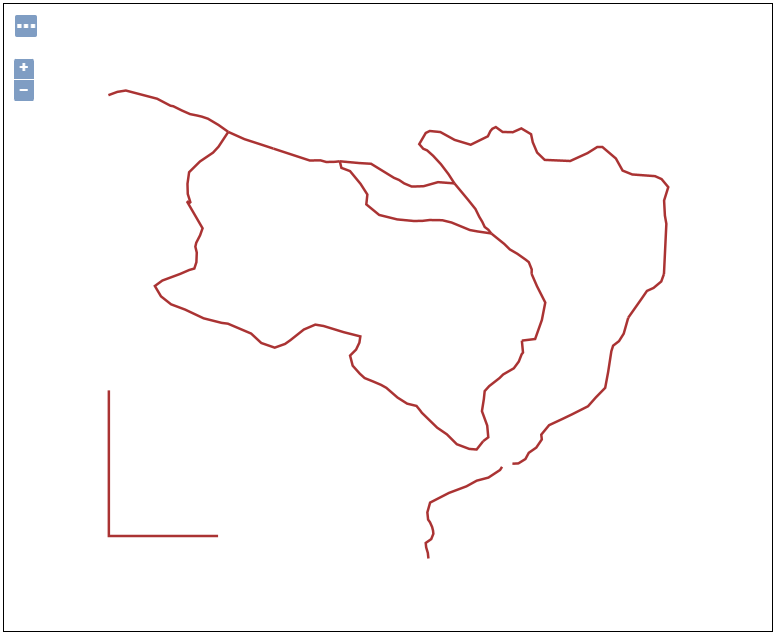
You have successfully used the insert feature with WFS transaction in GeoServer to add a new street to your dataset.
WFS Update Feature
The Update feature of the WFS transaction in GeoServer enables users to modify existing features within a geospatial dataset. By submitting a request that specifies both the feature type and the desired changes to attributes and geometry, users can efficiently update specific attributes while altering the shape, location, and size of various features.
Here are the steps to perform an update feature with WFS transaction in GeoServer:
-
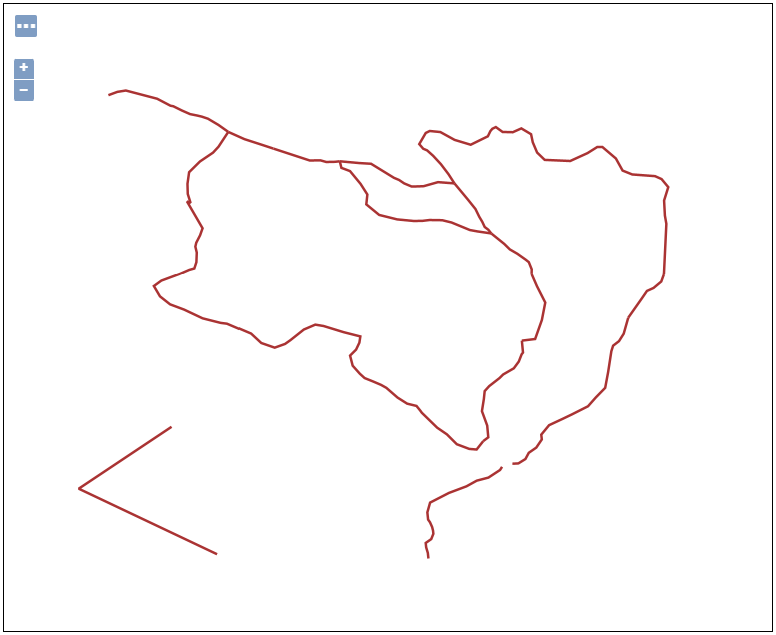
Select WFS_transactionUpdateGeom.xml from the Request drop-down list, then edit the codes as follows:
<wfs:Update typeName="topp:tasmania_roads"> <wfs:Property> <wfs:Name>the_geom</wfs:Name> <wfs:Value> <gml:MultiLineString srsName="http://www.opengis.net/gml/srs/epsg.xml#4326"> <gml:lineStringMember> <gml:LineString> <gml:coordinates>145.55,-42.7 145.04,-43.04 145.8,-43.4</gml:coordinates> </gml:LineString> </gml:lineStringMember> </gml:MultiLineString> </wfs:Value> </wfs:Property> <ogc:Filter> <ogc:FeatureId fid="tasmania_roads.15"/> </ogc:Filter> </wfs:Update> - Enter the username and password to be authorized, and then press the Submit button.
- After the GeoServer has processed the transaction request, go back to the Layer Preview section and open up the OpenLayers preview for the
tasmania_roadslayer. Your map should now look like this:
WFS Delete Feature
This operation allows users to selectively remove specific features from a dataset by providing their unique identifiers. The process of deleting features can be seamlessly executed through the WFS transaction capabilities in GeoServer.
This functionality gives users more control over their geospatial database, helping them manage and manipulate data efficiently. As an example, let’s remove the features whose type attribute is equal to road. To do this, follow the steps displayed on the screen:
-
Select WFS_transactionDelete.xml from the Request drop-down list, then edit the codes as follows:
<wfs:Delete typeName="topp:tasmania_roads"> <ogc:Filter> <ogc:PropertyIsEqualTo> <ogc:PropertyName>topp:TYPE</ogc:PropertyName> <ogc:Literal>road</ogc:Literal> </ogc:PropertyIsEqualTo> </ogc:Filter> </wfs:Delete> - Enter the username and password to be authorized, and then press the Submit button.
- After the GeoServer has processed the transaction request, preview for the
tasmania_roadslayer. As you can see, the features of typeRoadhave been deleted.
Remember that you can define filter conditions to remove the specific features using the WFS Delete transaction. This can include feature IDs, attributes, spatial extent or other criteria.
-
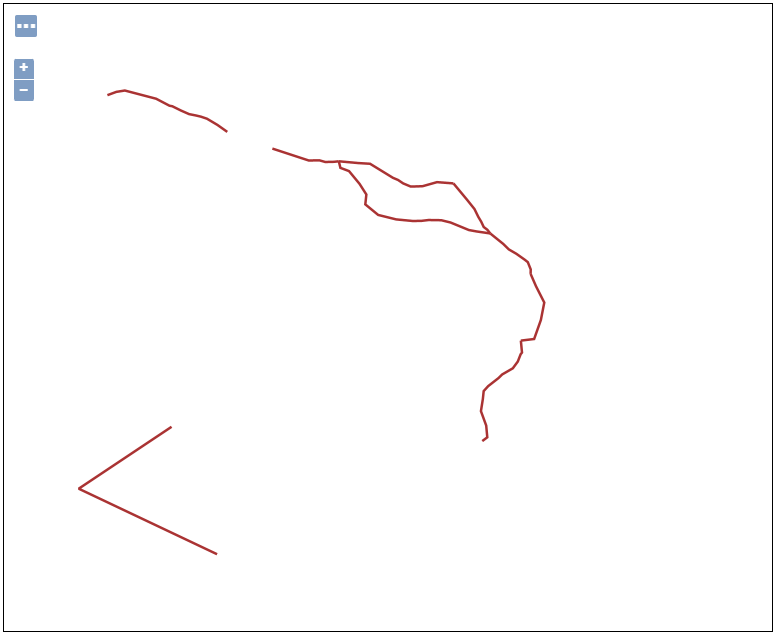
Again, select WFS_transactionDelete.xml from the Request drop-down list, then edit the codes as follows:
<wfs:Delete typeName="topp:tasmania_roads"> <ogc:Filter> <ogc:FeatureId fid="tasmania_roads.15"/> </ogc:Filter> </wfs:Delete> - Enter the username and password to be authorized, and then press the Submit button.
- After the GeoServer has processed the transaction request, open the OpenLayers preview for the
tasmania_roadslayer from the Layer Preview section. As you can see, thefid 15has been deleted.
In this session, we took a brief journey to explore WFS Transaction to insert update and remove features in GeoServer. If you want to access the complete tutorial, click on the link.