GeoServer Blog
Exploring Types of WPS Operations in GeoServer
GeoSpatial Techno is a startup focused on geospatial information that is providing e-learning courses to enhance the knowledge of geospatial information users, students, and other startups. The main approach of this startup is providing quality, valid specialized training in the field of geospatial information.
( YouTube | LinkedIn | Facebook | X )
Exploring Types of WPS Operations in GeoServer
This session covers the various Web Processing Service (WPS) operations available in GeoServer, emphasizing their roles within spatial data processing workflows.
For the complete video tutorial, click here.

Introduction
The OGC WPS interface defines three mandatory operations that every compliant server must implement:
- GetCapabilities: Retrieves metadata about the server’s available processes.
- DescribeProcess: Provides detailed information about a specific process.
- Execute: Runs a selected geospatial process with user-defined inputs.
These operations form the foundation of WPS-based geospatial analysis over the web.
Note: GeoServer does not include the WPS functionality by default. Follow this tutorial to download and install the WPS extension.
Note: This tutorial uses GeoServer version 2.25.3. Ensure that the WPS extension matches your GeoServer version precisely to prevent compatibility issues.
GetCapabilities
The GetCapabilities operation enables clients to query the server for service metadata, including available processes, supported versions, and provider details.
An example HTTP GET request for GetCapabilities:
http://localhost:8080/geoserver/ows?service=wps&version=1.0.0&request=GetCapabilities
Key parameters:
service = wps: Indicates a WPS request.version = 1.0.0: Specifies the WPS version.request = GetCapabilities: Defines the operation.
The resulting XML document provides a comprehensive overview of the WPS service, including server info, available processes, supported languages, and operational metadata.
DescribeProcess
The DescribeProcess operation allows clients to request detailed information about specific processes available on the WPS server. It includes descriptions of required inputs, allowable formats, and expected outputs.
Here is an example of how this operation can be used for the Buffer process:
http://localhost:8080/geoserver/ows?service=wps&version=1.0.0&request=DescribeProcess&identifier=JTS:buffer
There are four required parameters and values being passed to the WPS server:
- The service parameter is
WPS. - The version parameter is
1.0.0. - The request parameter tells the server that the operation requested is
DescribeProcess. - The identifier parameter tells the server what specific process is being described. Here is
JTS:buffer.
The response XML details the process, including identifiers, title, abstract, inputs, outputs, data formats, and constraints.
Execute
The Execute operation lets clients initiate geospatial processes or algorithms. It typically involves sending a request with process details, input data, parameters, and output preferences, after which the server processes the request and returns results.
For example, you can use a pre-defined demo request such as WPS_aggregate_1.0.xml from the demo section to test execution. To do this, navigate to the Demos section and select the Demo Requests option. From the Request drop-down list, select WPS_aggregate_1.0.xml request.
This operation provides a flexible, standardized method for running geospatial analyses via the web, making advanced processing tools accessible to a broader audience.
In this session, we covered the OGC WPS interface standard and its main operations. To explore the full tutorial, watch the video.
GeoServer 2.27.2 Release
GeoServer 2.27.2 release is now available with downloads (bin, war, windows), along with docs and extensions.
This is a stable release of GeoServer recommended for production use. GeoServer 2.27.2 is made in conjunction with GeoTools 33.2, and GeoWebCache 1.27.2.
Thanks to Peter Smythe (AfriGIS) for making this release.
CITE certification achieved
The GeoServer team are really pleased to announce that our long-lost CITE Certification has been regained (for 2.27) over the last 6 months.
OGC CITE Certification is important for two reasons:
- Provides a source of black-box testing ensuring that each GeoServer release behaves as intended.
- Provides a logo and visibility for the project helping to promote the use of open standards.
Many thanks to all who were involved! After approximately 10 years, we can once again officially confirm that GeoServer is OGC compliant. Thank you especially to Gaia3D and OSGeo:UK for sponsorship covering the expense of CITE Certification for 2025.
For more details, please read the separate announcement.
Release notes
New Feature:
- GEOS-11805 Option to disable the management of stored queries
Improvement:
- GEOS-11877 Improve CoverageView composition to support noData fill on missing bands/coverages
Bug:
- GEOS-10728 Cannot download GeoPackage if the source data contains UUID types
- GEOS-11708 STAC breadcrumbs rendering as plain text
- GEOS-11820 WCS spatial sub-setting does not work when native CRS != declared CRS
- GEOS-11832 count=0 service exception for some formats
- GEOS-11857 Random NPE In LocalWorkspaceCallback
- GEOS-11862 Layer Preview and Tile Layers page dropdown links broken after updating table
- GEOS-11865 MapDownloadProcess washes out 1 band gray images when transparency is on
- GEOS-11866 Prevent requests setting variables that should only be set by GeoServer
- GEOS-11879 Xalan causes a java.lang.NoClassDefFoundError
Task:
- GEOS-11831 OseoDispatcherCallback improvements
- GEOS-11834 Update PMD to 7.13
- GEOS-11882 Cleanup postgis-jdbc dependencies
For the complete list see 2.27.2 release notes.
Community Updates
We list these community modules purely as a service to the community to raise awareness of interesting add-ons to support, if there is sufficient common interest. They are not “production ready”.
How to make contact: browse the GitHub repo (https://github.com/geoserver/geoserver/tree/main/src/community > module > History) to see who:
- a) made the original commit,
- b) has been making changes (other than refactoring/dependency updates).
If you want to use a community module (in production), YOU need to arrange funding to:
- a) promote it to an official extension (passing tests, etc.) and
- b) maintain it going forward.
Community module development:
- GEOS-11727 OGC API Tiles tests require tile links to be available in the collections resource too
- GEOS-11728 OGC API Tiles returns an invalid content-disposition header
- GEOS-11822 OGC API procesess basic implementation
- GEOS-11829 Features templating ability to override schema
- GEOS-11830 Smart data loader create store page fails when environment variables are in use
- GEOS-11839 New Community Module for WPS Download in NetCDF output format for spatiotemporal coverages
- GEOS-11847 Next link is missing in “Search” OGC API - Features proposal implementation when startIndex is not set
- GEOS-11870 Singlestore(MemSql) datastore community module
- GEOS-11871 Allow native execution of group by in DGGS store, when grouping on geometries
- GEOS-11874 Align OGC API tiles API spec with specification
- GEOS-11875 Execute OGC API Tiles CITE tests
- GEOS-11876 WPS Vertical Longitudinal Profile: Support automatic distance computation
- GEOS-11878 WFS HITS request returns the whole data records on a GML feature templated layer
- GEOS-11880 OGC API Maps is not showing up in GeoServer home page
- GEOS-11883 OGC API process description lacks links
- GEOS-11884 OGC API process HTML input/outputs lack occurrences and formats
About GeoServer 2.27 Series
Additional information on GeoServer 2.27 series:
CITE Certification achieved
The GeoServer team are really pleased to announce that our long-lost CITE Certification has been regained (for 2.27) over the last 6 months.
OGC CITE Certification is important for two reasons:
- Provides a source of black-box testing ensuring that each GeoServer release behaves as intended.
- Provides a logo and visibility for the project helping to promote the use of open standards.
Recent activity:
- As part of a Camptocamp organized
OGC API - Featuressprint Gabriel was able setup a GitHub workflow restoring the use of CITE testing for black-box testing of GeoServer. Gabriel focused onOGC API - Featurescertification but found WMS 1.1 and WCS 1.1 tests would also pass out of the box, providing a setup for running the tests in each new pull request. - Andrea made further progress certifying the output produced by GeoServer, restoring the WMS 1.3, WFS 1.0 and WFS 1.1 tests, as well as upgrading the test engine to the latest production release. In addition, CITE tests that weren’t run in the past have been added, like WFS 2.0 and GeoTIFF, while other new tests are in progress, like WCS 2.0, WMTS 1.0 and GeoPackage.
- Peter set up multiple GeoServers for the testing and to act as reference implementations (hosting graciously provided by the Open Source Geospatial Foundation) and ran the test suites.
- Angelos Tzotsos (OSGeo) submitted the certification request to OGC.
- Gobe Hobona (OGC) approved all of our submissions.
Many thanks to all who were involved! After approximately 10 years, we can once again officially confirm that GeoServer is OGC compliant.
Developer Documentation
For developers, read more about the certification process and how to expand on it for additional services.
CITE Certification Sponsorship
Thank you to Gaia3D and OSGeo:UK for sponsorship covering the expense of CITE Certification for 2025.
This certification process is expensive, and we will require sponsorship for 2026 if we wish to maintain certified status.
However, as mentioned above, these CITE tests are automatically run as part of our build process for each new pull request, so we can unofficially verify that we pass CITE tests, but we cannot claim to be compliant.
If you/your organization finds the CITE Certification valuable, please contact the Project Steering Committee to sponsor the annual renewal. The more organizations that are able to sponsor, the lower the expense will be to each organization (sharing the approx USD $1,000 per year cost).
GeoServer WPS Extension Installation Guide
GeoSpatial Techno is a startup focused on geospatial information that is providing e-learning courses to enhance the knowledge of geospatial information users, students, and other startups. The main approach of this startup is providing quality, valid specialized training in the field of geospatial information.
( YouTube | LinkedIn | Facebook | X )
GeoServer WPS Extension Installation Guide
This session covers the steps to install the WPS (Web Processing Service) extension in GeoServer, enabling advanced geospatial data processing capabilities through standardized web service operations.
If you want to access the complete tutorial, click on the link.
Introduction
GeoServer is a powerful open-source server application that enables users to publish geospatial data and interactive maps on the web. It supports a wide range of data formats and protocols, making it a flexible solution for managing and delivering geospatial content. One of its standout capabilities is functioning as a geoprocessing server.
Geoprocessing involves analyzing spatial data to derive insights and perform operations such as Buffer, Clip, Union, Contour, and more. By default, GeoServer does not include Web Processing Service (WPS) functionality. However, WPS is available as an optional extension that’s easy to install. Adding this extension unlocks advanced geospatial analysis and processing features directly within GeoServer. To get started, download the WPS extension ZIP file that matches your GeoServer version.
Note: This tutorial uses GeoServer version 2.25.3. Be sure to download the WPS extension that corresponds exactly to your GeoServer version—mismatched versions will result in errors.
Installing the WPS Extension
Here are the steps to install the WPS extension in GeoServer:
- Navigate to the GeoServer website and select the download link.
- Under the Archive tab, choose the version that matches your installed GeoServer.
- Select the WPS option from the Services section. After a few seconds, the extension file will begin downloading automatically.
Prepare for Installation:
- It’s recommended to stop GeoServer before installing any extensions. This will prevent any potential conflicts or problems during the installation process.
- Unzip the downloaded WPS extension file.
- Copy all extracted
.jarfiles directly into theWEB-INF/libdirectory of your GeoServer installation. Ensure the extracted files are placed directly in this directory, avoiding subfolders. - Once the files are in place, restart GeoServer to ensure that the changes take effect. This activates the newly installed WPS extension.
Verifying the WPS Extension Installation
Once GeoServer is running again, open the GeoServer web interface. From the Server Status section, click on the Modules tab to confirm that the WPS extension is in the list of installed modules.
Testing WPS Functionality:
- Navigate to the Demos section in the GeoServer interface.
-
Select WPS Request Builder to access a tool for testing WPS processes.
- The WPS Request Builder consists of a drop-down list containing various processes. It supports many types of processes that are categorized based on prefixes. These prefixes are:
- JTS: Java Topology Suite
- geo: geometry processes
- ras: raster processes
- vec: Vector processes
- gs: GeoServer-specific processes
- The
geoandJTSprocesses return text-based analysis results but do not support internal GeoServer layers as input. - The
gsandvecfunction groups support both text input and GeoServer layers or WFS layer URLs. - For raster data analysis, use processes with the
Rasprefix.
In this session, we took a brief look at how to install the WPS extension in GeoServer. To access the full tutorial, click on this link.
June 2025 Vulnerability Disclosures
The GeoServer community has readied the following CVE vulnerabilities for public disclosure.
-
CVE-2025-30220 XML External Entity (XXE) Processing Vulnerability in GeoServer WFS Service (High)
Fixed: GeoServer 2.27.1 | GeoServer 2.26.3 | GeoServer 2.25.7 -
CVE-2025-30145 Denial-of-service (DoS) Vulnerability in Jiffle process (High)
Fixed: GeoServer 2.27.0 | | GeoServer 2.26.3 | GeoServer 2.25.7 -
CVE-2025-27505 Missing Authorization on REST API Index (Moderate)
Fixed: GeoServer 2.26.3 | GeoServer 2.25.6 -
CVE-2024-38524 GWC Home Page exposes sensitive server information (Moderate)
Fixed: GeoServer 2.26.2 | GeoServer 2.25.6 -
CVE-2024-40625 Coverage REST API Server Side Request Forgery (Moderate)
Fixed: GeoServer 2.26.0 -
CVE-2024-29198 Unauthenticated SSRF via TestWfsPost (High)
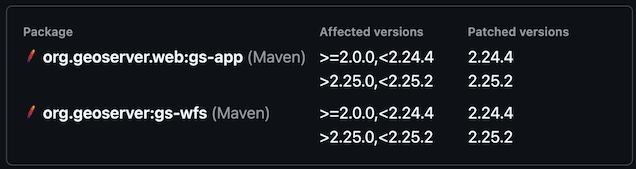
CVE-2021-40822 SSRF in TestWfsPost for specific targets, e.g. PHP + Nginx (High)
Fixed: GeoServer 2.25.2 | GeoServer 2.24.4This duplication is due to CVE-2021-40822 being generated prior to our use of CVE records.
-
CVE-2024-34711 Improper ENTITY_RESOLUTION_ALLOWLIST URI validation in XML Processing (SSRF) (High)
Fixed: GeoServer 2.25.0
The release announcements listed above have been updated.
Free software is a participation sport - to create a patch for a prior release volunteer with community development.
Q: How often should I upgrade GeoServer?
GeoServer operates with a time boxed release cycle, maintaining “stable” and “maintenance” releases, over the course of a year.
-
Upgrade GeoServer twice a year as new stable releases are made.
-
Once the release you are using has entered “maintenance” it is a good idea to upgrade (before the release is no longer supported).
-
GeoServer security policy provides one year of support. You may also contact our service providers for extended support beyond this timeframe.
Q: Notification of security vulnerabilities?
Stay up to date:
-
Please monitor release announcements for the heading “Security Considerations”.
Security Considerations
This release addresses several security vulnerabilities, and is a recommended upgrade for production systems.
You can review the release announcement, and decide to update.
-
When everyone has had an opportunity to update the details of the vulnerability are announced.
Security Considerations
This release addresses several security vulnerabilities, and is a recommended upgrade for production systems.
- CVE-2024-29198 Unauthenticated SSRF via TestWfsPost (Moderate)
-
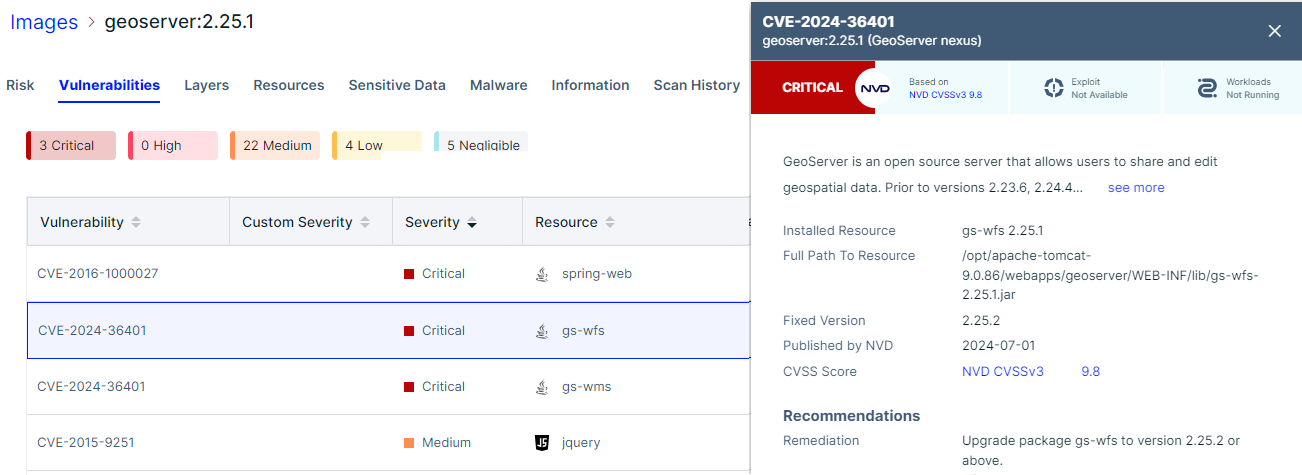
Review the full vulnerability to learn more:
-
Scanning tools also have access to this information when the report is published:
Q: Notification of security reports?
As incoming security reports contain sensitive information they are only shared with representatives of the geoserver-security email list.
Participation in geoserver-security, like commit access, is volunteer based and reflects trust.
Please review GeoServer Security Policy if you are in a position to help out.